
I’ve got a number of home video files in MKV format that I put forced subtitles on. I found this very helpful when I was filming action footage when bike riding for example as sometimes you can barely hear the audio for the wind noise etc.
For my old media player I used the SRT format for compatibility but after switching to Apple TV and MP4, I found that I couldn’t force or burn in the SRT files using HandBrake. This will work for any MKV file that has an SRT subtitle track which you would like to burn in for playback on Apple TV devices, for example Forced Subtitles / Foreign Language parts. The solution to this took some investigation but eventually I managed to find a straight forward way of doing this and wanted to share it with you.
Process for Using HandBrake to Burn in Subtitles from MKV to MP4 for Apple TV
In short the process is as follows:
1 – Extract and Convert the SRT from the MKV
2 – Remux the MKV with the SSA instead of the SRT
3 – Run the MKV through HandBrake and Burn In the SSA
You will need the following free tools:
Subtitle Edit
MKVMerge
HandBrake
Sounds simple right? Well it is.
1 – Extract and Convert the SRT from the MKV
The first step is to extract and convert the current subtitle from the MKV file and to do this we use Subtitle Edit.
Go to File > Open and search for your .mkv file
Once you open the file, it will load the subtitle track into the editor.
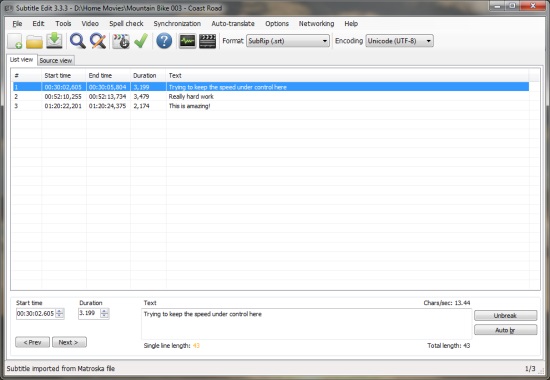
The next step is to save as an SSA file. Go to File > Save As and Choose ‘Sub Station Alpha (*.ssa)’ from the list.
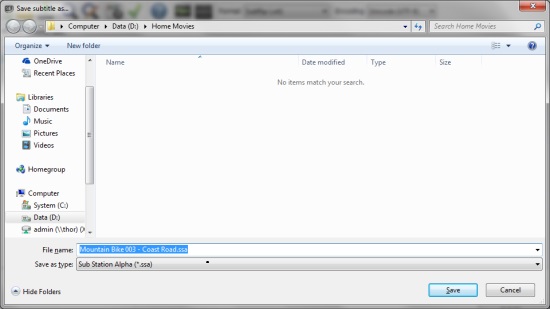
This creates a .ssa subtitle file that now can be used by HandBrake to burn in, however – we still need to get it back into the .mkv file so HandBrake can see it.
2 – Remux the MKV with the SSA instead of the SRT
The second step is to now remux the .mkv using MKVMerge.
Open MKVMerge and click on the Add button

Navigate to the folder where both your original .mkv file and newly exported .ssa subtitle file is and open the .mkv
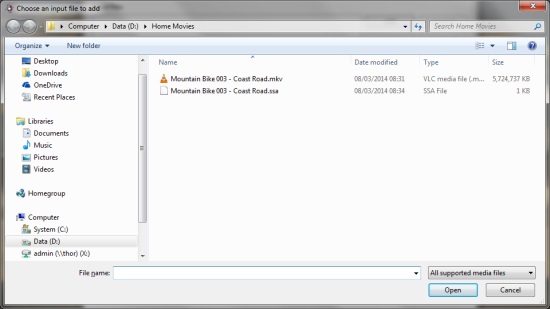
Once the .mkv file has opened, you will see the individual video, subtitle and audio streams. Untick the .srt subtitle file that is currently contained in your .mkv
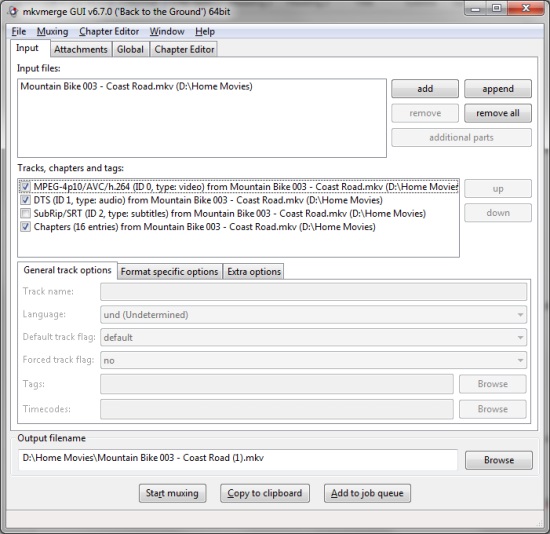
Then click add again, this time selecting the .ssa file. It should then appear in the input files list and the tracks, chapters and tags list.
Check the output filename and click Start muxing
The .mkv file will then be re muxed with the new .ssa file. The time taken for this can vary, but is only generally a minute or so. The final step is now to burn in the subtitles using HandBrake.
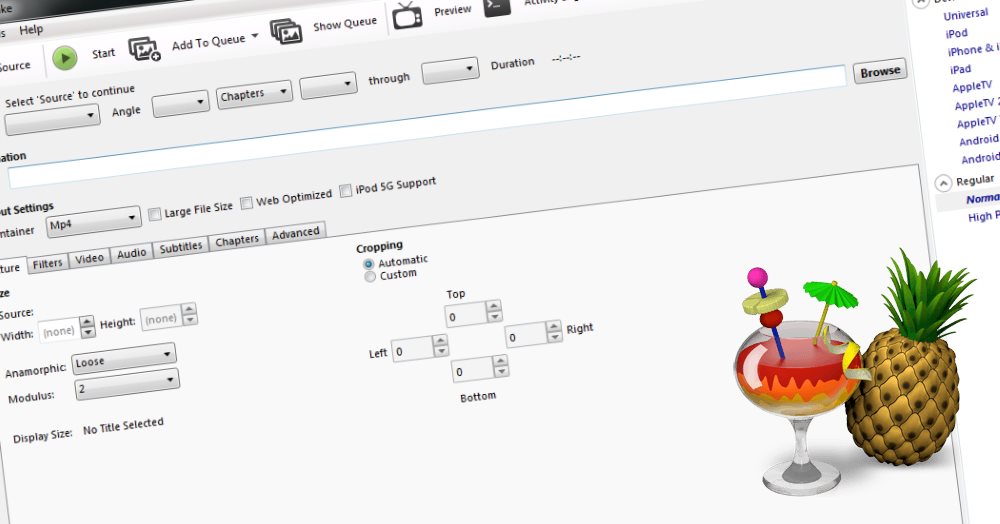
3 – Run the MKV through HandBrake and Burn In the SSA
In a similar way to how you’d proceed after following the steps in our Ripping Bluray Movies into iTunes for Apple TV guide, Open HandBrake and choose Source > Open File
Select your new .mkv file and choose your preferred Apple filter from the right panel (Even though I own Apple TV 3’s I always use the Apple TV 2 filter as I think the quality of 720p versus the disk space cost is the best balance).
Go to the subtitle tab and click Add.
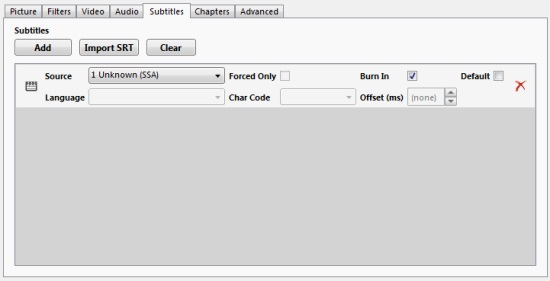
The .ssa file should now appear. Simply click the Burn In check box which should now be available and run HandBrake as normal to create your video file.
Conclusion
Your subtitles will now be actually burned into the .mp4 file and will play back perfectly on the Apple TV.
I hope you’ve found this article helpful, please feel free to share and leave comments.
If you like this guide, we’ve previously added a guide for Ripping Blu-ray Movies into iTunes for Apple TV
Found you by way of a forum on videohelp.com. Thanks for this very, very informative post!!
My pleasure.
Thanks 🙂
This worked, thanks.
I really wonder why you can’t do this directly from .srt
Glad the article helped. No idea why .srt files aren’t supported directly, shame though.
THANKS A MILLION!!
You’re very welcome 🙂
You, you just solved my problems. I can’t even believe it you bloody legend you! Thank you SO MUCH! You’re a god send!
Damn I have to go back in and say just how much I love you right now, this is absolutely perfect! I just found even better news out too, some of the mkv’s I want to burn subs into have actually got .ASS files included which can be burnt in without needing to MUX anything together.
You’re very welcome 🙂
Thank you so much for writing this up. Works like a charm!
I’ve been experimenting with different types because i want certain parts to be forced and other parts to be optional. So i made 2 ssa files, muxed both with the video file and in Handbrake, burned in 1 whilst leaving the other normal.
The problem is that it seems the act of burning in an ssa file changes he font set up. Do you have any idea how to fix it so that there is no change to the font?
Thanks
Hey Jack, unfortunately that’s not something I’ve ever needed to do so cannot comment. Perhaps one of our readers will suggest something.
Thx for using SE 🙂
My pleasure Nikolaj, it’s a fantastic product – keep up the good work! 🙂
hmm I’m trying to figure out to have “Burn in” option already pre-selected once I open the file as I like to do batch encoding and don’t want to keep clicking that option for every file
Not sure you can have this option selected by default as it depends on which type of subtitle you are using.
What is it exactly you’re trying to do in bulk and is Handbrake the right tool?
Brilliant! Been so frustrated with Handbrake..found this via a forum link. Thank you.
My pleasure 🙂
Thanks for the steps, BigGeek. I don’t work with video often, and I forget what tools I use.
Glad the article helped 🙂
Thanks for the steps on this, although it has been bugging a bit. I can get as far as the first 2 steps but when i go to burn in the subs in handbrake it doesn’t seem to do anything and my outputted file has no subtitles at all.
I’ve been tearing my hair trying to think of what it could be im doing wrong.
My steps are:
1: open .srt in Jubler and convert to .ssa
2: Remux .ssa into MKV through mkvtoolnix
3: convert to mp4 in handbrake and select burn in ssa.
i have also turned off chapter markers when converting but nothing seems to work.
I doing this on a mac, but cant imagine that would make any difference. i seem to be doing all the correct steps but nothing seems to have worked when i test the file in Quicktime or VLC.
Hey Jai,
Sorry to hear you’re having problems getting this to work.
Couple of questions:
1) Once you’ve remuxed, are you able to see the subtitles in VLC before you actually convert it into the MP4?
2) Once you open the remuxed file in Handbrake, are you clicking the ADD button then selecting the ‘unknown’ subtitle track? It sometimes doesn’t appear on its own until you click ADD.
Hope this helps.
Hey BigGeek,
thanks for the swift response.
I have checked the newly remuxed file and the subtitle track appears perfectly within VLC, so I know that part has gone fine.
In the Mac version of Handbake there is no ‘Add’ button, only one for ‘external srt’. However there is a dropdown from which i can pick the ssa track and check ‘burn in’. Please see image link.
(Link removed)
from thereon I cant figure out why its not burning anything in. I have unchecked chapters markers and still nothing.
any help would be greatly appreciated
Hi Jai,
I’ve removed the link to the image, this guide and the others I’ve written are not about encouraging piracy. The image you’ve provided clearly shows you working with an illegal file – you sure you want to broadcast that to the world?
Sorry but I can’t help any further.
I used to use Subtitle Edit to extract subtitles, but for some reason it did not work anymore. Do you know other tool that can extract subtitles?
Hey, first off, thanks for posting this. I’m sure it’s helped many many people. However, as a Mac user, I’m running into the same problems Jai was. There is no “Add” button. I have a drop down menu with “Add All” or “Add External SRT”. Since SRTs don’t work, I selected “Add All”.
However, in the subtitle track option, it doesn’t mention anything about SSA. It just says “Unknown (Text)” I tried it anyway, and it did not work.
Any ideas?
For reference : http://i.imgur.com/WU8aNL2.jpg
Hey Jacob,
Sorry but my Mac exposure with Handbrake is nil.
It might be worth making a post on the official forum thread and perhaps referencing this post as the thing you’re trying to do on Mac?
https://forum.handbrake.fr/viewforum.php?f=5
Good luck and sorry I couldn’t help further.
This method still works in 2021. The interfaces are different but the options are there. Thank you so much!
That’s amazing news! Thank you for confirming
Thank you. I use a PC so this looked a little different for me in fact I probably could have skipped the mkvmerge step and now it’s gonna be at least 2 hours before I see the results but I’m cautiously optimistic. Plus my PC is 10 years old so it’s a miracle I got this done at all. They need a program like this for Android